
TrackingHardware
Software
Mega PlanEtc. |
Main /
I2CWe wrote a kernel driver to allow communications between the Gumstix and the Brainstem over the I2C bus. The driver writes Acroname packets to Hello World of Device DriversIn this part, we will create a very simple character device driver which allows a userland process to open an associated device file, and read from the device. The device returns "Hello World!". Sample code: Attach:hello-dev.tar.gz A kernel module requires an initialization function for loading, and an exit function for unloading. These functions are passed to macro definitions in init.h. module_init(robot_dev_init); module_exit(robot_dev_exit); Module InitializationFor a static int __init robot_dev_init(void)
{
int result;
result = register_chrdev(42, "robot", &robot_fops);
if (result)
{
printk(KERN_ERR "%s: Driver Initialization failed\n", __FILE__);
return result;
}
return 0;
}
Data StructuresThe device driver requires several data structures. The file_operations structure contains a bunch of pointers to functions. For this example driver, our robot device just needs to support file open. static struct file_operations robot_fops = {
.owner = THIS_MODULE,
.open = robot_open,
};
The brainstem_fops structure is a file_operations structure which contains pointers to functions which should handle file requests for Brainstem devices. All functions defined here are registered with the kernel. For this example, we are only interested in the the read function. static struct file_operations brainstem_fops = {
.owner = THIS_MODULE,
.read = brainstem_read,
};
Opening Our Device FileWhen our driver is loaded and a device with a major number of 42 is opened, the robot_open() function is called. The inode structures contains the minor number of the device file that the user is trying to open, and we perform the appropriate action based on this value. If the Brainstem file_operations structure's open variable points to a function, then call it. In the example driver, the file_operations open variable is not used. If the minor device does not have an open function, then return success, otherwise open the function. The code looks like: static int robot_open(struct inode *inode, struct file *filp)
{
switch (iminor(inode))
{
case 1:
filp->f_op = &brainstem_fops;
break;
default:
return -ENXIO;
}
if(filp->f_op && filp->f_op->open)
return filp->f_op->open(inode, filp);
return 0;
}
Reading From Our Device FileAfter opening the device file, a userland process can read from it. Since the kernel operates in different memory space, we need to pass the size of the read buffer and a buffer to store the bytes. Also, we need to use the static ssize_t brainstem_read (struct file *file, char __user *buf,
size_t count, loff_t *offset)
{
char message[] = "Hello World!\n";
if(count > sizeof(message))
if(copy_to_user(buf,message,sizeof(message)))
return 0; /* error */
return (sizeof(message));
else
if(copy_to_user(buf,message,count))
return 0; /* error */
return count;
}
Unloading the ModuleThe exit function unloads the module from the kernel, and just unregisters the device's major number. static void __exit robot_dev_exit(void)
{
unregister_chrdev(42,"robot");
}
Building the ModuleAfter downloading and installing the Gumstix buildroot on your local machine, create a directory menu "Robot Hardware support"
depends on I2C
config I2C_ROBOT
tristate
default n
config ROBOT_BRAINSTEM
tristate "Acroname Brainstem Driver"
depends on I2C && EXPERIMENTAL
select I2C_ROBOT
help
This is the driver for the Acroname Brainstem over I2C
endmenu
Also, create obj-$(CONFIG_ROBOT_BRAINSTEM) += robot.o ifeq ($(CONFIG_I2C_DEBUG_CHIP),y) EXTRA_CFLAGS += -DDEBUG endif In obj-y += busses/ chips/ algos/ to obj-y += busses/ chips/ algos/ robot/ In source drivers/i2c/algos/Kconfig source drivers/i2c/busses/Kconfig source drivers/i2c/chips/Kconfig to source drivers/i2c/algos/Kconfig source drivers/i2c/busses/Kconfig source drivers/i2c/chips/Kconfig source drivers/i2c/robot/Kconfig Now reconfigure the kernel. make menuconfig Under "Device Drivers | I2C Support | Robot Hardware Support", select the "Acroname Brainstem Driver" to be built as a module. Exit, saving this change. Build the new driver as a module: make modules Finally transfer the new filesystem to the Gumstix. So Does it Work?Over serial, login into the Gumstix as root. To run the driver, first load the module using mknod /dev/brainstem c 42 1 First, load the # cat /dev/brainstem Hello World! Hello World! Hello World! Press Ctrl-C to stop reading. Finally, remove the module from the kernel: rmmod robot Final I2C Device DriverOur kernel driver was developed based on the following diagram: 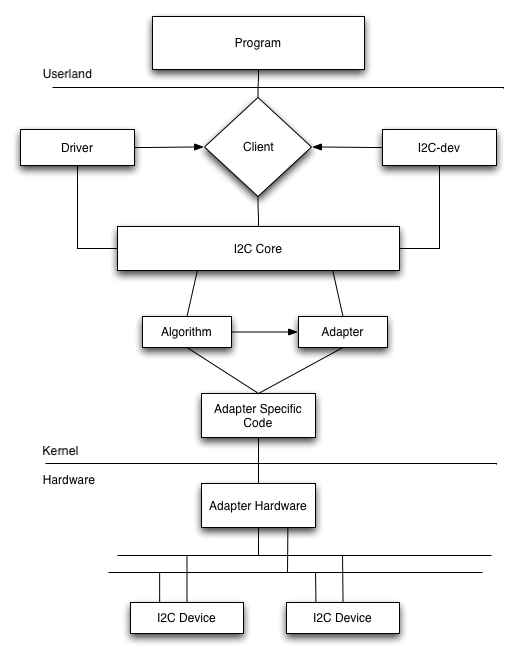 The figure maps to files in the Linux kernel as follows:
The I2C-dev block allows the userland program to access the Brainstem through the char packet[] = {
2, /* Brainstem Address */
3, /* Data size */
33, /* cmdSRV_ABS */
2, /* Servo 2 */
200 /* Servo Position 200 */
};
file = open("/dev/brainstem", O_RDWR);
write(file, packet, sizeof(packet));
close(file);
The Brainstem libraries follow a similar constrcution. The driver is accessed by creating an instance of a driver structure. This driver structure is then registered with the kernel through i2c-core functions. The driver structure contains a pointer to an i2c_adapter structure, which in turn contains a pointer to an i2c_algorithm data structure. Our driver structure looks like: struct i2c_driver { struct module *owner; char name[32]; int id; unsigned int class; unsigned int flags; int (*attach_adapter)(struct i2c_adapter *); int (*detach_adapter)(struct i2c_adapter *); int (*detach_client)(struct i2c_client *); int (*command)(struct i2c_client *client,unsigned int cmd, void *arg); struct device_driver driver; struct list_head list; }; Upon instantiation, we set the following values:
The next step is to define the i2c_adapter structure: struct i2c_adapter {
struct module *owner;
unsigned int id; unsigned int class;
struct i2c_algorithm *algo;
void *algo_data;
int (*client_register)(struct i2c_client *);
int (*client_unregister)(struct i2c_client *);
struct semaphore bus_lock;
struct semaphore clist_lock;
int timeout;
int retries;
struct device dev; /* the adapter device */
struct class_device class_dev; /* the class device */
int nr;
struct list_head clients;
struct list_head list;
char name[I2C_NAME_SIZE];
struct completion dev_released;
struct completion class_dev_released;
};
We'll have an array of these things, with 1 of them for each I2C bus. The array is filled from the attach_adapter() callback function from above. We only have 1 bus, so our array will be small. But our driver needs to be written so that it will work when more than one I2C bus is present. An i2c_adapter has a pointer to an i2c_algorithm structure: struct i2c_algorithm {
char name[32];
unsigned int id;
int (*master_xfer)(struct i2c_adapter *adap,struct i2c_msg msgs[], int num);
int (*smbus_xfer) (struct i2c_adapter *adap, u16 addr, unsigned short flags,
char read_write, u8 command, int size, union i2c_smbus_data * data);
int (*slave_send)(struct i2c_adapter *,char*,int);
int (*slave_recv)(struct i2c_adapter *,char*,int);
int (*algo_control)(struct i2c_adapter *, unsigned int, unsigned long);
u32 (*functionality) (struct i2c_adapter *);
};
Since none of the existing drivers have slave_recv() implemented, we developed our own. Although you have direct access to an algorithm's master_xfer() function, the wrapper functions in i2c-core should be used instead. There is some locking which must occur, to avoid problems. The wrapped functions take care of this.
Interrupt handlerThe driver required an interupt handler to manage reads and writes. We needed both a top half for master reads, and a bottom half for slave receives. Master Reads In i2c-algo-pxa, master_xfer() calls i2c_pxa_do_xfer() which calls adap->wait_for_interrupt(). wait_for_interrupt points to i2c_pxa_handler(). So the way a master read works is:
The wait_for_interrupt() puts the current task on a wait queue. It will stay on the wait queue until an I2C interrupt occurs. Slave Receive The approach taken for master reads won't work for slave receives. We can't call wait_for_interrupt() from within an interrupt handler (top half). What's needed is a bottom half for the interrupt handler. The bottom half is called after returning from the interrupt. Using drivers/block/floppy.c as a model, the interrupt handler does:
So, we clear the Slave Address Received flag in the top half of the interrupt handler, and then schedule slave_receive work which should be run as the bottom half. Then return from the interrupt. At this point, the bottom half can go through and do things pretty much the way a master receive does. |