Getting started with Android
1) Download and install the Android SDK, making sure to follow the steps in “preparing you development computer.” Keep in mind that Android has known issues with some versions of Eclipse, however both 3.5.2 Galileo Classic and 3.7.0 Indigo Classic (the latest version) work fine. We also tested this with Java 6, but not with the latest JDK 7… you may try that at your own risk.
http://developer.android.com/sdk/installing.html
2) Download and install ADT Plugin for Eclipse.
http://developer.android.com/sdk/eclipse-adt.html#installing
Remember to set your SKD location in Window->Preferences->Android.
3) Open the “Android SDK and AVD manager” in Eclipse (under the Window menu and also toolbar) and add at least one platform (API level) to your SDK. Different API levels support different features. If you plan to test your code on a real phone, make sure to download and test your code against the same API level as your phone. Keep in mind that Android version 3 and above is meant for tablets, not phones.
http://developer.android.com/sdk/adding-components.html
4) Create an Android Virtual Device (AVD):
http://developer.android.com/guide/developing/tools/avd.html#creating
5) Check that it works by running the Hello World demo:
http://developer.android.com/resources/tutorials/hello-world.html
When they say that Android may take a couple of minutes to start, they mean it: in addition to your application, it will be loading a ton of software that normally comes with a phone. You will see a dialogue with a virtual keyboard on the right and a display on the left. While loading, the display will say “android” and when it’s done it will look like a phone display - or your app. If you don’t see your app, look for the app launcher on the screen (interact with the virtual keyboard as needed) and then look for your app.
6) You may want to go through the SDK guide:
http://developer.android.com/guide/index.html
7) You may also take a look at the list of available code samples:
http://developer.android.com/resources/samples/index.html
To create a project from a sample
1) Select File->New->Project->Android Project

You will get a dialogue like this:
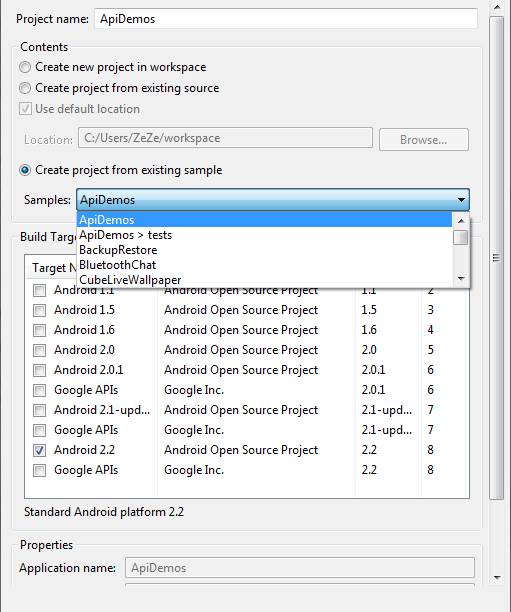
2) Select “Create project from existing sample”. Then select the target API level (only then the list of samples gets enabled), then select the sample you want. Remember to name your project.
3) Select Run->Run As->Android Application