CS 100 HW 3: Python Drawings
- Due: 12:00noon Thursday 10/1/2015
- Submit to Blackboard by deadline
- May also submit hard copy for extra feedback
CHANGELOG: Empty
Table of Contents
1 Instructions
- Complete the problems in each section below which is labelled Problem
- This is a pair assignment: you may select one partner to work with on this assignment as a group of 2. You may also opt to work alone as a group of 1.
- You may collaborate with your group members on all aspects of the assignment including writing code and creating your HW write-up document. All members of your group should retain copies of the code and writeup document. Your group is not allowed to collaborate with other groups. If you are struggling, ask questions on Piazza, seek help from the TA or professor, and review the class notes and tutorial links provided.
- Write your code in a file called
hw3.py. You must submit this file to blackboard for full credit on the assignment. - You must also submit a HW Writeup which is an electronic document
in one of the following formats.
- A Microsoft Word Document (.doc or .docx extension)
- A PDF (portable document format, .pdf)
You may work in other programs (Apple Words, Google Docs, etc.) but make sure you export/"save as" your work to an acceptable format before submitting it.
- Only 1 member of your group should submit the hw1.py and the HW Writeup on Blackboard
- Make sure the HW Writeup has all group member's information in it:
CS 100 HW 3 Writeup
Group of 2
Turanga Leela tleela4 G07019321
Philip J Fry pfry99 G00000001
- Make sure that
hw3.pyhas all group member's information in it in comments# CS 100 HW 3 source code # Group of 2 # Turanga Leela tleela4 G07019321 # Philip J Fry pfry99 G00000001
- Submit 2 files to our Blackboard site.
- Log into Blackboard
- Click on CS 100->HW Assignments->HW 3
- Press the button marked "Attach File: Browse My Computer"
- Select your HW Writeup file (
.doc .docx .pdf .html .txtonly) - Again: Press the button marked "Attach File: Browse My Computer"
- This time select your
hw3.pyand attach it. - Click Submit
- If you want verbose feedback print a copy of your HW writeup and submit it in class on the due date. You must still submit an electronic version.
2 Taking Screen Shots
For most of the problems you will work on in this assignment, you will need to take a screenshot of the drawings you create. Below are instructions to do so on the two most common platforms.
Windows 8/8.1
For a picture of the full screen, press the PrintScreen button which
is usually high up on the keyboard, possibly accessed by holding the
Fn key and pressing some other key.
After pressing this combination, a picture will be saved and on the clipboard so you can paste it directly into a Word or Wordpad document.
For a partial screen shot, You use the "Snipping Tool" which allows
you to take a partial screenshot. Search for "Snipping Tool" and press
the New -> Rectangular Snip, the select the area you would like to
capture.
Mac OS X
To capture your entire screen, Press Command (⌘)-Shift-3. The screenshot is added to your desktop. Double clicking will open the picture which you can then copy and paste into a document.
To capture some of your screen, Press Command (⌘)-Shift-4, and then drag the crosshair pointer to select the area.
3 Use the Global Turtle
While our Python textbook, How to Think Like a Computer Scientist,
favors using several turtles at once, we will not have much reason to
do this. To make life easier this HW will use a global turtle which
you can access by using the following import statement as
demonstrated in the first class.
from turtle import *
# There's now a global turtle around which you can command as follows

forward(100)
penup()
backward(50)
right(90)
color("green")
forward(200)

# When you want to get rid of everything the turtle has drawn use
clear()

# When you want the turtle to do things faster do
speed(0)

# To hide and show the turtle if you don't want him in a screenshot
hideturtle()
showturtle()
Defining functions with the global turtle is much easier as you can simply use instructions inside of a function definition such as the 5-pointed star function here.
# Make a 5-pointed star of given size
def star(size):
    for i in range(points):
        forward(size)
        right(144)
Turtles can do lots of things which are described in the official Python Module Documentation which is here: https://docs.python.org/3/library/turtle.html
Documentation is often times hard to read the first few times so you might want to look at the below summary of common commands.
| Method | Parameters | Example | Description |
|---|---|---|---|
| forward | distance | forward(50) |
Moves the turtle forward |
| backward | distance | backward(50) |
Moves the turtle backward |
| right | angle | right(120) |
Turns the turtle clockwise |
| left | angle | left(65) |
Turns the turtle counter clockwise |
| penup | None | penup() |
Picks up the turtles tail |
| pendown | None | pendown() |
Puts down the turtles tail |
| color | color name | color("red") |
Changes the color of the turtle’s tail |
| goto | x,y | goto(-12,32) |
Move the turtle to position x,y |
| begin\fill | None | begin_fill() |
Remember the starting point for a filled polygon |
| end\fill | None | end_fill() |
Close the polygon and fill with the current fill color |
| clear | None | clear() |
Clear everything the turtle has drawn |
| stamp | None | stamp() |
Leaves an impression of a turtle shape at the current location |
| shape | shapename | shape("turtle") |
Should be ‘arrow’, ‘classic’, ‘turtle’, or ‘circle |
4 Problem 1: Draw a Pinwheel
Below is a picture of the blocks used by Code.org's artist to create a "pinwheel"
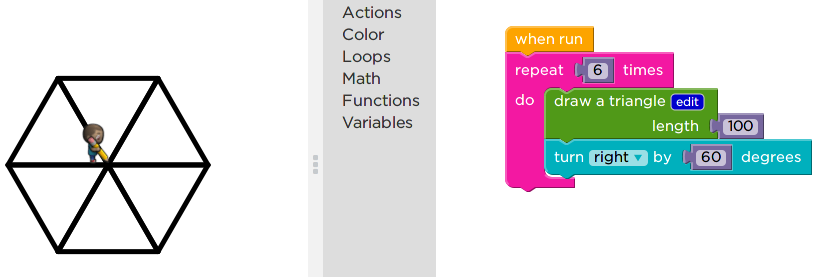
Figure 1: Code.org artist creating a pinwheel
Recreate this set of blocks to draw a pinwheel using the Python turtle as shown in the picture below.
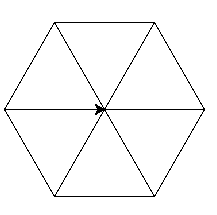
Figure 2: Turtle drawing a pinwheel
You'll likely want to use the following function which draws an equilateral triangle.
# Draw an equilateral triangle using the given turtle
#
# Parameters
# size: how big the sides of the trianlg should be
def draw_triangle(size):
    for i in range(3):
        forward(size)
        right(120)
Its only argument is the parameter size which indicates the side
lengths of the triangles.
Write a function called draw_pinwheel(size) which draws a pinwheel
like the one shown above. The pinwheel takes a number argument size
which indicates how big it should be.
- You will need to repeatedly draw a triangles using the
draw_triangle()provided function. Copy and paste this function into your own python file. - In between each call to
draw_triangle(), adjust the angle of the turtle so that it next triangle is rotated from the first. - There is an important difference from the code.org blocks shown:
they only draw pinwheels of size 100. You should write your function
draw_pinwheel(x)as a function which takes a size parameter and draws a pinwheel of the size given.
What to put in your HW Write-up
- Paste in your code for
draw_pinwheel(size) - Take a screenshot of your drawing of a pinwheel with sides of size
350 by calling
draw_pinwheel(350)in the interactive Python loop.
5 Problem 2: "I'm walking into spiderwebs"
Turtles are not known for creating webs, but now that our turtle knows how to draw a pinwheel, it is an easy step for it to create a spiderweb.
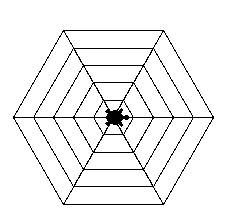
Figure 3: A Turtle in a Spider Web
Define a function called draw_spider_web(layers) which repeatedly
draws pinwheels in order to create a spiderweb.
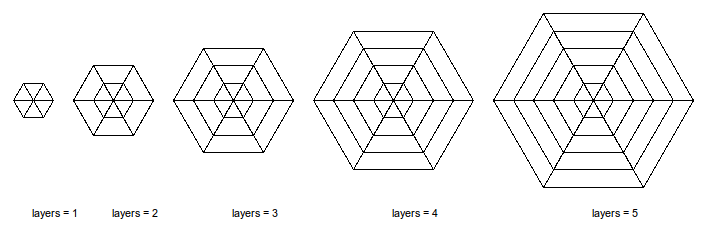
Figure 4: Spiderwebs drawn with various values for the layer parameter
- The parameter
layersis how many layers to make the spiderweb. See the diagram above to see what is meant by a layer: the more layers, the larger the web. - Each layer is a pinwheel which is drawn using the
draw_pinwheel()function. A 1-layer spiderweb is a pinwheel with size 20. A 2-layer spiderweb is a 1-layer web with a size 40 pinwheel around it. A 3-layer web adds a size 60 pinwheel. - Each layer adds a pinwheel that has size \(20 \times\) layer number.
- Be careful because the
range(x)function in python produces a sequence of numbers which starts at 0: the codefor i in range(4): print(i)
will print 0, 1, 2, 3.
What to put in your HW Write-up
- Paste in your code for
draw_spider_web(layers) - Take a screenshot of your drawing of a spiderweb with 8 layers by
calling
draw_spider_web(8)
6 Filled Drawings
Color makes life more fun and turtles come with this capability. Suppose we are dealing with squares that we want to color. We already have a function to draw squares.
def draw_square(size):
    for i in range(4):
        forward(size)
        right(90)

Figure 5: A square drawn using draw_square(50)
Using the functions color(c), begin_fill(), end_fill() we can create
a new function to draw colored squares.
def draw_filled_square(size,color_name):
    color(color_name)
    begin_fill()
    draw_square(size)
    end_fill()
Figure 6: A square drawn using draw_filled_square(100,"green")
Notice the function calls to set the color. Color names must be double-quoted like "green" and "blue".
The calls to begin_fill() and end_fill() dictate what area will
ultimately get painted with the turtle's color.
7 Problem 3: draw_colored_pinwheel(size,color1,color2)
Define a function called draw_colored_pinwheel(size,color1,color2)
which creates a pinwheel with alternating colors.
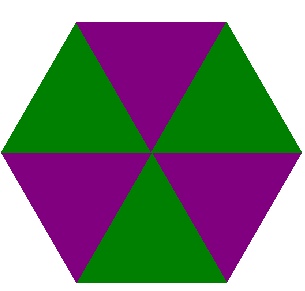
Figure 7: A colored pinwheel drawn using draw_colored_pinwheel(150,"purple","green")
This function is a little trickier as it requires alternation between the two parameter colors. The general strategy is the following.
- Start with your
draw_pinwheel()function - During each iteration of the loop decide which color to set the
turtle to using the
color()function- On even iterations, use
color1 - On odd iterations, use
color2 - Use an
if/elsestatement to do the decision making
- On even iterations, use
- After deciding the color, surround a call to
draw_triangle()withbegin_fill()andend_fill()so that drawing the triangle creates a colored triangle.
If you have have forgotten, you can use an if/else to check for
even/oddness in python as follows.
my_number = 3
if(my_number % 2 == 0):     # the remainder of dividing by 2 is 0
    print("The number is "+str(my_number))
    print("The number is EVEN")
else:                       # the remainder must be 1
    print("The number is "+str(my_number))
    print("The number is ODD")
What to put in your HW Write-up
- Paste in your code for
draw_colored_pinwheel() - Take a screenshot of the result of calling
draw_colored_pinwheel(225,"red","blue")
8 Range in Reverse
The python function range(number) is good for generating the
sequence of numbers 0,1,2,3,...,number-1. There are times which one
may want to generate a different sequence however. For that, there
are two alternative invocations of range().
range(start,stop): this version produces the numbers,start,start+1,start+2,...,stop-1. For examplefor in in range(5,10): print(i)
will print the numbers
5,6,7,8,9.range(start,stop,change): this version produces the numbers,start,start+step,start+step,.... It is good for counting down rather than up. For examplefor in in range(10,3,-1): print(i)
will print the numbers
10,9,8,7,6,5,4(but not3).
9 Problem 4: Hypnoturtle
The Hypnotoad (all glory to the Hypnotoad) is a distant relative to the
python turtle. In this problem we will exercise the hypnotic power of
the turtle by defining a draw_hypnoturtle(layers,color1,color2)
function that combines ideas from draw_spider_web() and
draw_colored_pinwheel().
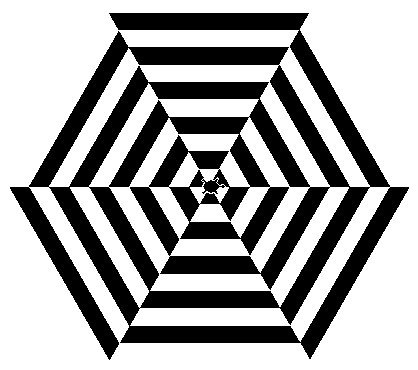
Figure 8: The Hypnoturtle, produced with draw_hypnoturtle(10,"black","white")
The function draw_hypnoturtle(layers,color1,color2) should work as follows
- Repeatedly draw a colored pinwheel using the two requested colors
- The number of repeats, like in
draw_spider_web()is the number of layers. The size of each layer changes by 20 pixels as when drawing spider webs. - Work backwards form largest layer to smallest layer. This is required because larger layers would cover of the smaller layers if they were drawn from small to big.
- Review the previous section of the HW Range in Reverse if you have already forgotten how to generate a reverse sequence of numbers.
- The order of
color1andcolor2should alternate for each colored pinwheel. For a black/white Hypnoturtle, the outermost layer should be generated usingdraw_colored_pinwheel(size,"black","white"), the next smallest layer bydraw_colored_pinwheel(size,"white","black")(notice the color order swapped), the next smallest bydraw_colored_pinwheel(size,"black","white"). The size should change each time, getting smaller by 20 pixels. - Color the Hypnoturtle appropriately at the end of the function using
color(color2,color1)
What to put in your HW Write-up
- Paste in your code for
draw_hypnoturtle() - Take a screenshot of the result of calling
draw_hypnoturtle(12,"blue","red")- Make sure to use
speed(0)to make the turtle go as fast as possible as it may take a while to - Don't stare at the Hypnoturtle too long as it may cause you to change your major to computer science.
- Make sure to use
10 Problem 5: Venting
After spending some time programming, it is good to reflect on the difficulties it poses. Each group member should write a paragraph (4-6 sentences) response to what they found difficult or frustrating about programming AND what they found interesting. If you are in a group of 2, make sure that both group members clearly mark their paragraph of venting. For example, the following group of 2 used the following format to make the ownership of their venting paragraphs clear.
Venting by Philip J Fry:
Programming totally blows because it involves typing and these days I
should be able to talk to my computer and tell it what to do and ...
[continues for 4 more sentences]


Venting by Turanga Leela:
I really enjoyed the programming because the computer actually LISTENS
and does what I tell it to do unlike Fry and Bender.  It's very
refreshing to...
[continues for 5 more sentences]
Include group member vents in your HW writeup.