The Structured Test Automation Language Framework
Introduction
The Structured Test Automation Language framEwork (STALE) is a test automation tool that implements the Structured Test Automation Language (STAL). STALE can read Eclipse Modeling Framework (EMF) - based UML behavioral diagrams. Testers can use STALE to create mappings from basic identifiable element of a diagram to the test code. Once the mappings are generated, STALE can create tests automatically from abstract tests.
Downloading the test automation tool
If you are using a Mac, please click here.
If you are using a Windows, please click here.
Installation
Preparation
After downloading and unzipping the zip file, then you should be able to see two files: taf.jar (taf_Windows.jar for Windows users) and a directory called "project".
Setting Up JDK
Because the tool calls the Java compiler to compile tests, the environment variable JAVA_HOME has to point to a JDK 7 directory and the environment variable PATH has to include the $JAVA_HOME/bin.
Do not include any JRE in the PATH.
For Mac users:
Open the Terminal, type "echo $JAVA_HOME" and "echo $PATH" and make sure the environment variables JAVA_HOME and PATH are correctly set.


If you do not know how to install JDK 7 on a Mac, please read the article about how to install JDK 7
and how to set up the JAVA_HOME and PATH environment variables.
For Windows users:
Open the command line, type "echo %JAVA_HOME%" and "echo %PATH%" to make sure the environment variables JAVA_HOME and PATH are correctly set.
If you do not know how to install JDK 7 on a Windows machine, please read the articles about how to install JDK 7 and update the PATH environment variable.
Important: sometimes, %JAVA_HOME%\bin has to be put at the beginning of the environment variable "PATH" so that the Java compiler can be found.
Otherwise, a Null Pointer Exception will occur.
An Example
Use the vending machine program as an example. The goal of the experiment is to generate tests automatically using the test automation tool from a UML state machine diagram
of the vending machine program.
The vending machine program has a vendingMachine class, a JUnit test case,
and a UML state machine diagram (the diagram has been shown below).
An existing Eclipse project of the vending machine program is wrapped in a zip file, which can be imported by Eclipse.
The example JUnit tests will help users to understand how to test the program.
The state machine diagram for the vending machine program is shown below:
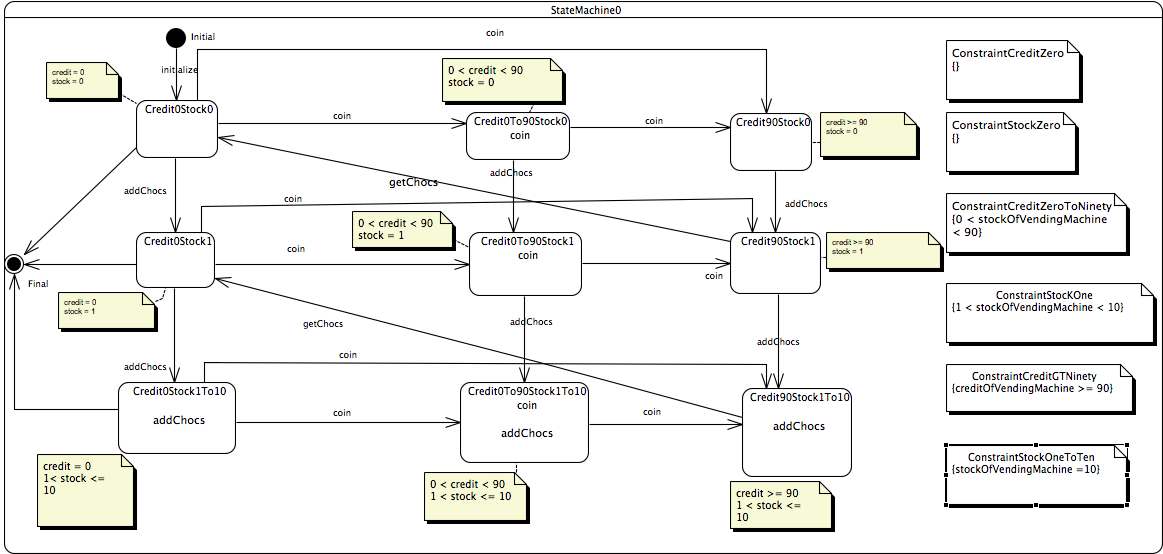
The states are connected by the transitions. The comments describe the statuses of each state. The constraints are listed at the right of the diagram and they
are named starting with "Constraint".
- "ConstraintCreditZero" specifies that the credit of the vending machine is 0 cent and it has to be satisfied in the states
Credit0Stock0, Credit0Stock1, and Credit0Stock1To10.
- "ContraintStockZero" specifies that the stock size of the vending machine is 0 and it has to be satisfied in the states
Credit0Stock0, Credit0To90Stock0, and Credit90Stock0.
- "ContraintCreditZeroToNinety" specifies that the credit of the vending machine is between 0 and 90 cents and it has to be satisfied in the states
Credit0To90Stock0, Credit0To90Stock1, and Credit0To90Stock1To10.
- "ContraintStockOne" specifies that the stock size of the vending machine is 1 and it has to be satisfied in the states
Credit0Stock1, Credit0To90Stock1, and Credit90Stock1.
- "ContraintCreditGTNintety" specifies that the credit of the vending machine is no less than 90 cents and it has to be satisfied in the states
Credit90Stock0, Credit90Stock1, and Credit90Stock1To10.
- "ContraintStockOneToTen" specifies that the stock size of the vending machine is between 1 to 10 and it has to be satisfied in the states
Credit0Stock1To10, Credit0To90Stock1To10, and Credit90Stock1To10.
The model was created using Eclipse Papyrus, a tool that supports EMF (Eclipse Modeling Framework)-based UML models.
If users want to edit or see more about the diagram, please install Eclipse Papyrus (See installation instructions below).
Otherwise, go the next section Downloading the test automation tool.
Installing Papyrus to View the Model
- Install Eclipse (Eclipse Juno 4.2 is recommended but at least Eclipse 3.7 or higher) and choose install new software from the menu Help.
- Enter the site http://download.eclipse.org/releases/juno (or another version).
- Select Modeling->papyrus SDK Binaries (incubation).
- Keep clicking on the next button, accept the agreement, and finish the installation.
Running the tool with no existing projects
Users can build a new project, add models to the project, create mappings from elements of the models to executable code, and generate tests using the test automation tool.
Starting the tool
For Mac users, type "java -jar taf.jar" in the Terminal.
For Windows users, type the same command "java -jar taf.jar" in the command line.
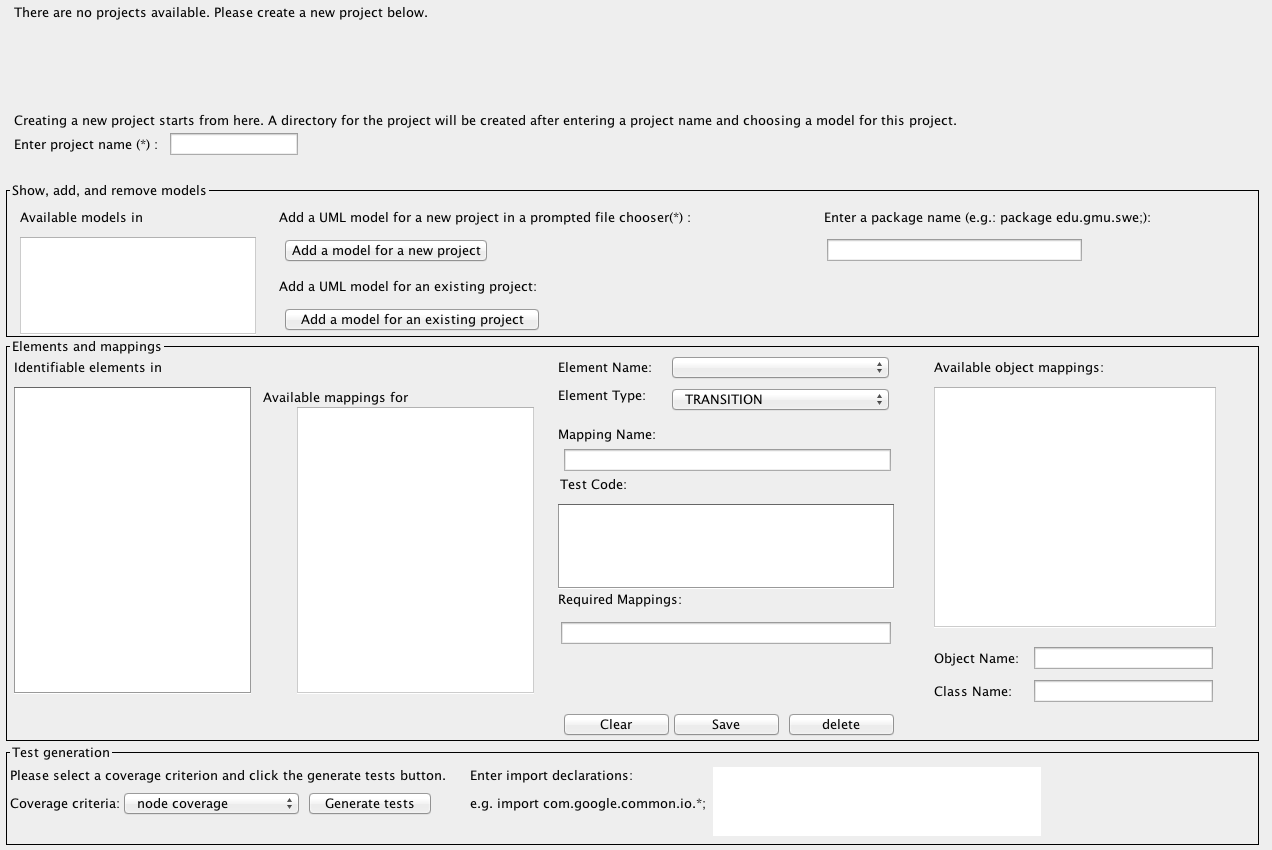
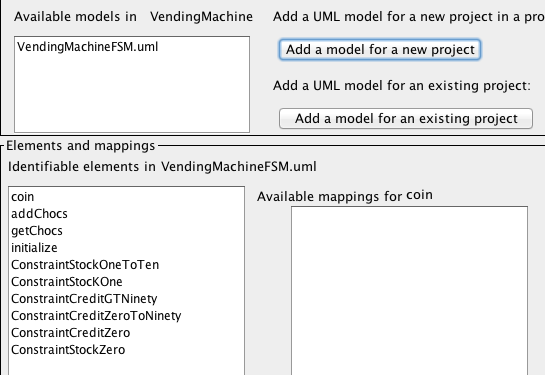
Then you should be able to see a GUI. Since there are no projects under the root directory "project", the tool does not show any projects.
Creating a new project
Enter VendingMachine for the project name and press the button "Add a model for a new project". A file chooser will pop up and then you need to select
the UML model.
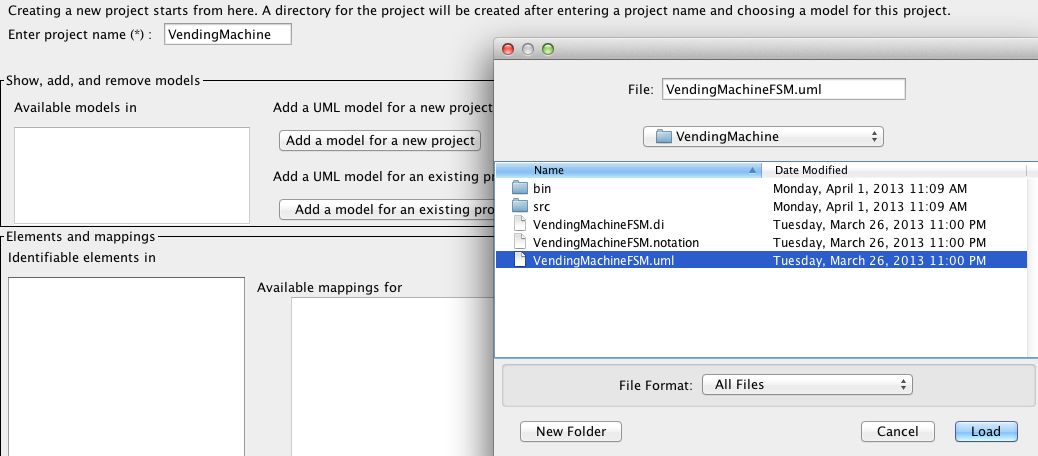
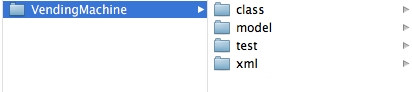
After clicking on the "load" button, the model will be added to the project.
A directory called "VendingMachine" will be created under the root directory "project" and four sub-directoires "class", "model", "xml", and "test"
will be created as well. The selected model has been put in the "model" folder. The "class" folder keeps the program class files and dependent Jar files.
But users have to put classes under test and dependent Jar files (vendingMachine.class for this case) under the sub-directory "class" by hand.
In the "xml" subdirectory, mappings are saved in an Xml file (e.g. projectNameFSM.xml) that has the same name as
the model (e.g. projectNameFSM.uml).
Automatically generated tests are in the "test" folder. There is another folder in the "test" folder called "temp" which has intermediate test files
that are used to evaluate constraints.
Adding mappings
Next step, users need to create mappings for elements in the model. Double clicking on an element in the element list such as "initialize".
The name and type of the element will be filled automatically in the comboBoxes "Element Name" and "Element Type". Users need to type a mapping name, test code or required mappings if
necessary. Then click the "save" button.
Below shows a mapping for the transition "initialize".
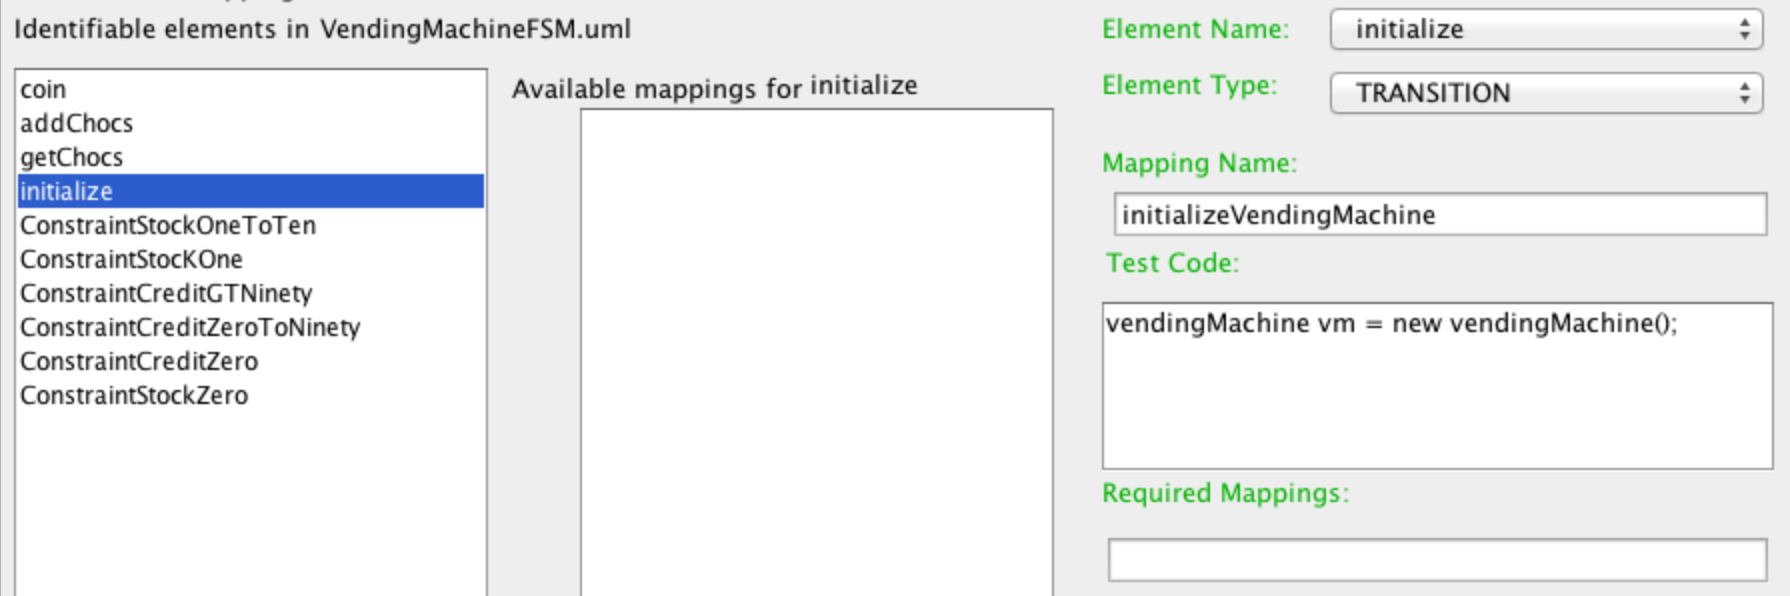
This initialization mapping will be required in other mappings because the object "vm" is also used in other mappings.
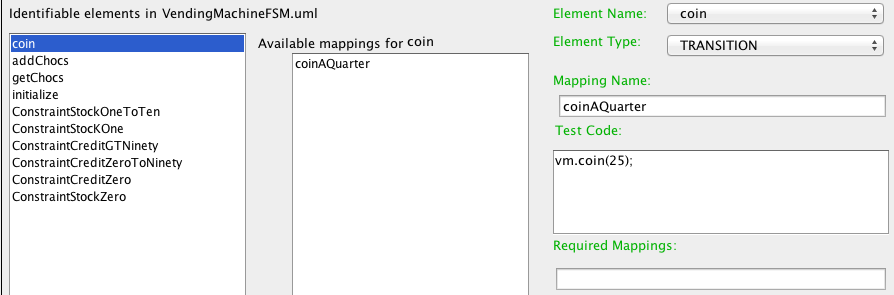
Below shows a mapping for the transition "coin". When generating the test code from this mapping, the object "vm" needs to be initialized. So users need to add
the mapping "initializeVendingMachine" defined above in the field of required mappings for the mapping created for the transition "coin". Thus, the test code for the transition "coin" will be executed
following the "vm" initialization. However, if in every test path, the transition "initialize" is executed
before the transition "coin", you do not need to put the initialization mapping in the required mappings field
since the test code for the object initialization will be executed before any other mappings.
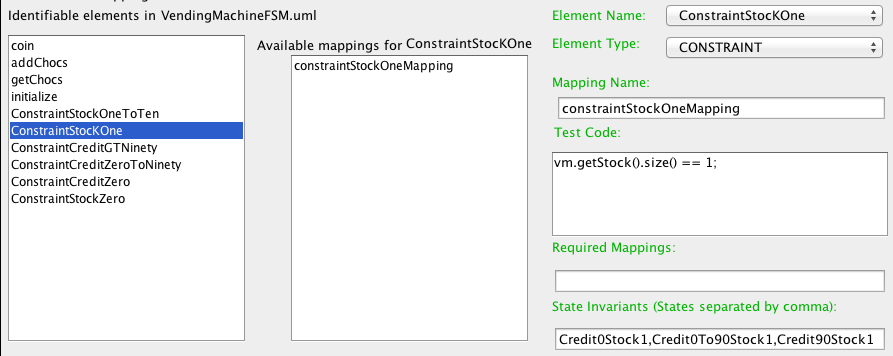
Below is a mapping for the constraint ConstraintStockOne. When double clicking on the constraint "ConstraintStockOne", its name, type, and constrained elements will be filled
automatically as well. In this case, constraints are only used for state invariants. Thus, the field of state invariants only shows the states that have the constraint.
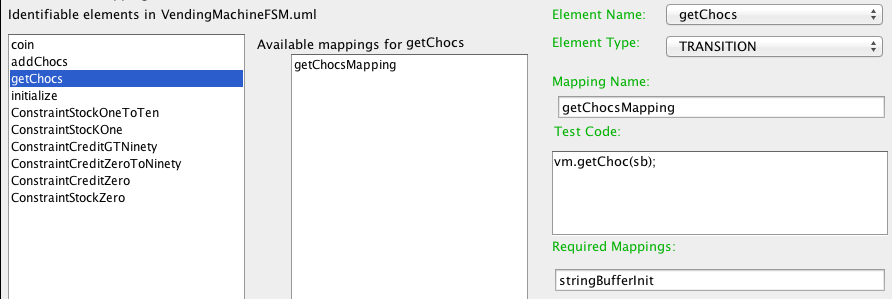
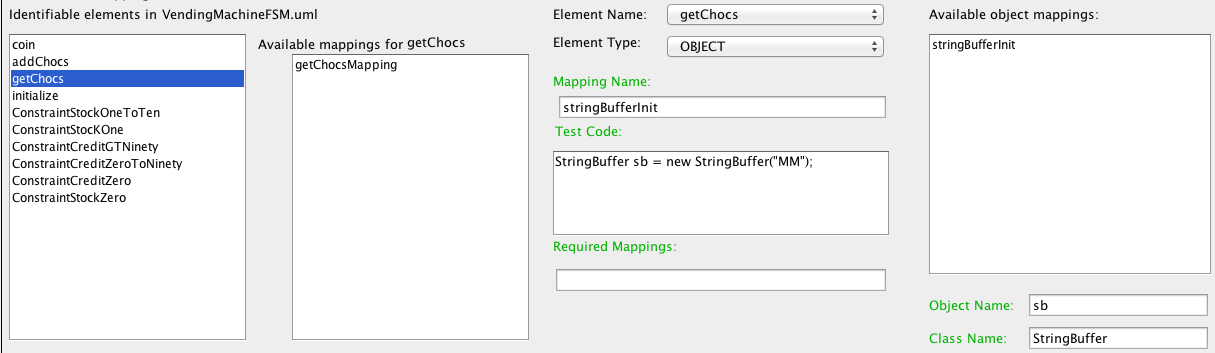
Below is a mapping for the transition getChocs that uses object mappings. Because the parameter "sb" that is an object of class StringBuffer needs to be
initialized, the parameter will be mapped to test code for "sb" initialization.
Select "OBJECT" in the comboBox of "Element Type" and then you need to fill in the green fields for the object mapping "stringBufferInit" for the parameter "sb".
Generating tests
Do not forget to put import declarations and the format is exactly as in Java.
The default import declarations in the tool are: "import java.io.*; import org.junit.*; import static org.junit.Assert.*;\n".
Besides the default import declarations, users need to add others if required.

Once all necessary mappings are generated, users should select the edge coverage criterion and press the button "generate tests".
The generated tests will be under the sub-directory "test".
The Terminal or command-line will show the time used for test generation:

Go to the top
Last modified: May 15, 2013.